
COMMENT 16


Copyright ESA/Rosetta/NAVCAM – CC BY-SA IGO 3.0
COMMENT 15
COMMENT 14
Ma’at pit delaminations


Copyright: ESA/Rosetta/MPS for OSIRIS Team MPS/UPD/LAM/IAA/SSO/INTA/UPM/DASP/IDA/A.COOPER
COMMENT 13
 Copyright ESA/Rosetta/NAVCAM – CC BY-SA IGO 3.0
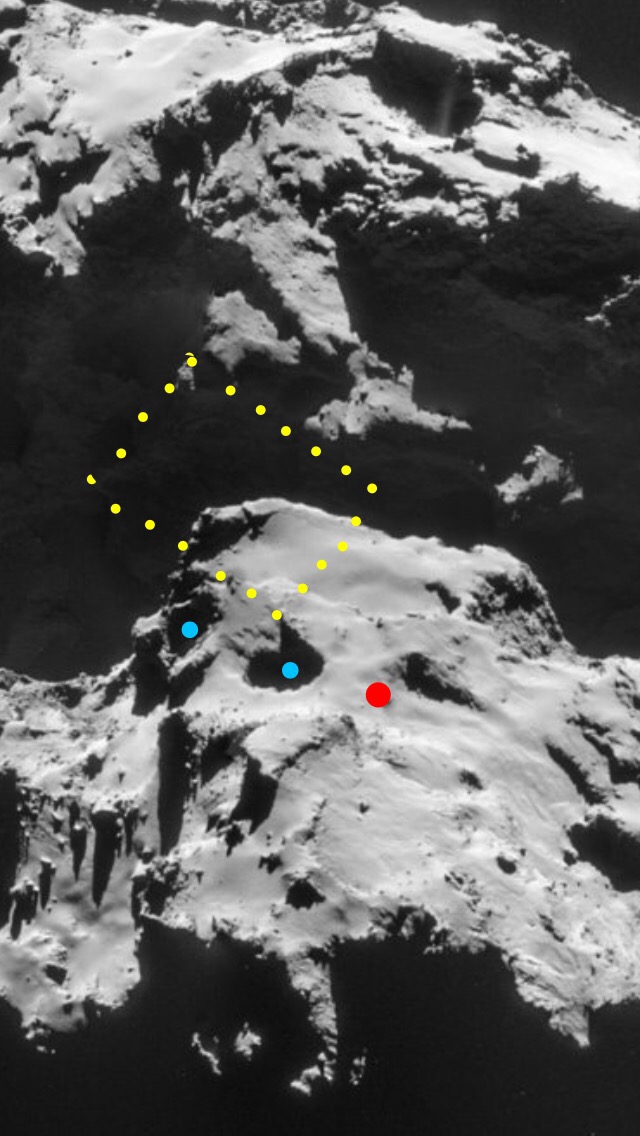
Location of Ma’at 01, 02 (Dier El Medina) and 03. 03 is rather elusive. It’s above that scarp, not below it and gets whited out in most photos as is the case here.
Each pit has a central blue dot.
01 and 03 have their perimeters dotted. 02 is obvious. Rosetta’s landing target is between 02 and 03.
Dark green is the head rim (border between Ma’at and Hathor).
/////END OF COMMENT 13
COMMENT 12
Fig S8 from “The morphological diversity of comet 67P/Churyumov-Gerasimenko” Thomas et al. 2015

Copyright: ESA/Rosetta/MPS for OSIRIS Team MPS/UPD/LAM/IAA/SSO/INTA/UPM/DASP/IDA/N.THOMAS ET AL (2015)
///// END OF COMMENT 12
COMMENT 11

Copyright ESA/Rosetta/NAVCAM – CC BY-SA IGO 3.0
COMMENT 10
This comment shows the location of the NAVCAM photo for Cometwatch 22nd August (Rosetta blog post dated 2nd September 2016):
Cometwatch photo- this is looking down Ma’at towards the head rim from above. Note pointy rock at top.
Copyright ESA/Rosetta/NAVCAM – CC BY-SA IGO 3.0
This next photo is the ‘right’ way up i.e. with the head lobe above the body lobe. There’s a larger context photo further below. The Cometwatch photo is almost perfectly framed in the top half, dusty area. The Cometwatch photo stops right on the head rim so below the head rim in this photo is off-frame in the Cometwatch photo. Pointy rock is in the middle just above the head rim.
Copyright ESA/Rosetta/NAVCAM – CC BY-SA IGO 3.0
A more zoomed-out context version of the above. It’s at top-left with Hathor below the head rim. Hapi at bottom; Anuket at right. 
Copyright ESA/Rosetta/NAVCAM – CC BY-SA IGO 3.0
This tweet has a nicely enhanced photo of the same area at a spectacularly low profile looking up the head lobe in the opposite direction to the Cometwatch version. The area in question is biased towards the left of the picture.
It shows how tall the cliff is at the back, in this photo, which is the cliff near the bottom of the Cometwatch photo. Since we’re looking down on it in that photo, it doesn’t look so tall as in this tweeted photo.
///////END OF COMMENT 10
COMMENT 9
Photo showing the area of the outburst in February 2016 (circled in pink) in the context of massifs sliding away from the shear line.

////////// END OF COMMENT 9
COMMENT 8- re Marco’s moving boulders in Part 55.
Photos 1 to 3- crops used below.


Photo 4- the white circle.
Photo 5- white and yellow circles.
Photo 6- Part 55 fiduciary points showing boulder movement. Large red- actual rock and extrapolated point in ‘bay 1’ parallel to crack.
Small red- former seating of large red rock behind yellow fiduciary point as per Part 55. And its own extrapolated point via same process as above for the large red dot. This means this photo also proves the red rock moved and so this acts as corroboration of the Part 55 photos.
Terracotta- front corners of the rectangle.
Bright green- back of rectangle (not visible but it is in Part 55).
Slate blue- single dot showing former seating of upper moved rock.
Other colours: as for Part 55.
Photo 7- Part 55 fiduciary points on second photo. Large Light blue- the back two rocks. The nearer one is on the rectangle (perched on this side of it).
Small light blue- the position of the rock in photo 6 (i.e. where it moved to).
Small red- note the movement again as defined by the lines parallel to the crack.
Other colours: as for photo 6.
Photo 8- Part 55 fiduciary points on third photo. 
All colours- as above. The blue rock’s future position isn’t marked here but the red rock’s future position is marked.
Photo 9- correct alignment for the right hand white line. The pink dot is at the end of a correctly produced line from the two blue boulders at the back. The white line is therefore somewhat misaligned. Mauve is a fiduciary rock for lower down photos. 
Photo 10- correct alignment for the left hand yellow line. The orange dot is at the end of a correctly produced line from the two blue boulders at the back. The yellow line is therefore somewhat misaligned.  The pink and orange dots are therefore closer than the line tips. The residual difference (distance anomaly) corresponds to less than a rock width at the other end. It may be due to this and/or to parallax at this end owing to the scarp. The plain where the rocks are is clearly a lot flatter than the scarp so any parallax is far more likely to be this end of the corrected white/yellow lines and therefore in an irrelevant location (except that it’s relevant to the chosen fiduciary points that are 200 metres from the rocks in question).
Photo 11- this shows the depth of the scarp (fuchsia dropping down the terraces from the flatter area).  Pink/orange- as above
Light blue- (foreground) the end of a line produced from the future blue rock position as shown below from the top-down view.
Photo 12- this shows the top-down view with the same extrapolated blue dot on the right above the pink dot. It’s extrapolated from the actual moved rock i.e. a line drawn between the two blue rocks and produced. It’s not drawn through the two blue dots which are off-centre but through the rock centres.

As you can see, the extrapolated blue dot is above both the pink and orange dots suggesting movement even on this measure which has nevertheless been shown above to be inaccurate.
Photos 13 to 15- this is a full zoom of the rectangle, yellow feature, red rock seating and the blue moving rock. It’s included because the dots in the zoomed out version obscure the detail. It’s fuzzy but all the features are there as in Part 55. It includes the ‘W’ that was dotted orange in Part 55 in red. It’s dotted pale mauve here. In the gif the bright green dots are there but elusive. 

PHOTO CREDITS
FOR NAVCAM:
Copyright ESA/Rosetta/NAVCAM – CC BY-SA IGO 3.0
To view a copy of this licence please visit:
http://creativecommons.org/licenses/by-sa/3.0/igo/
All dotted annotations by A. Cooper.
FOR OSIRIS:
Copyright: ESA/Rosetta/MPS for OSIRIS Team MPS/UPD/LAM/IAA/SSO/INTA/UPM/DASP/IDA/A.COOPER
END OF COMMENT 8
/////////////////////////.
COMMENT 7 Just a few matches and slides around Anuket


Copyright ESA/Rosetta/MPS for OSIRIS Team MPS/UPD/LAM/IAA/SSO/INTA/UPM/DASP/IDA/A. Cooper
Photo 1- south pole showing various tears and fracture lines. 
Apologies for red and yellow clashes. This is an old photo and the new annotations have same colours due to precedent.
Red along south pole- head rim shear line. See below for other red line to the left.
Pink- tear that diverges from head rim shear line and curves upwards, cutting across the strata layers.
Yellow across south pole-continuation of the stratum layer that the red shear line follows from this end to the beginning of the yellow line. See below for yellow at right.
Navy blue- edge of the head where it drops away to the south pole side. This is the Maftet border.
[old annotations]
Brown- paleo rotation plane.
Red rim- bell curve on rim at Serqet betraying herniation.
Yellow- no bell curve at Bastet betraying forward stretch vector.
PHOTO CREDITS
Copyright ESA/Rosetta/NAVCAM – CC BY-SA IGO 3.0
To view a copy of this licence please visit:
http://creativecommons.org/licenses/by-sa/3.0/igo
All dotted annotations by scute1133.
/////////// COMMENT 2:
EDGE-ON ONION LAYERS AT THE SOUTH POLE

Light blue- edge-on, broken off onion layers.
Terracotta- shear line on body and head rim match (more accurate in Part 30 header.
Red- match of v-shape within shear line.
VIEW FROM AKER/BASTET

Red to left of midpoint- the same layers as the light blue lines above. Notice the leftmost one is terracotta because it’s the inside, underside edge of the shear line head match onion layer.
Dark blue- rotation plane.
Brown- paleo rotation plane.
A. CORRADINI GATE RIFT (Comment 3)
Regarding photo credits for this comment:
2 OSIRIS photos have the OSIRIS credit below them. The rest are NAVCAM:
Copyright ESA/Rosetta/NAVCAM – CC BY-SA IGO 3.0
To view a copy of this licence please visit:
http://creativecommons.org/licenses/by-sa/3.0/igo
All dotted annotations by scute1133.
View of Anubis/Atum from ‘above’ near the head lobe

Copyright ESA/Rosetta/MPS for OSIRIS Team MPS/UPD/LAM/IAA/SSO/INTA/UPM/DASP/IDA
Two views from below:


Long-distance showing the two rifts:
 Showing the valley:


The next photo is from the Anubis/Atum stretch signatures page (see menu bar) showing that the valley with the two rectilinear rifts at either end is just one of several rifted (delaminated) main onion layers and is surrounded by a multitude of smaller delaminations. All of them run in the same direction which is in keeping with aligning along the rotation plane. This strongly implies delamination via stretch due to centrifugal spin-up. Large red dot is A. Corradini gate. The rift at the other end also has a red dot.
 Copyright ESA/Rosetta/MPS for OSIRIS Team MPS/UPD/LAM/IAA/SSO/INTA/UPM/DASP/IDA
ORIGINALS:


COMMENT 4- IMHOTEP ‘RED’ SLIDE MINI MATCH
The red slide is in Part 43. The two gifs and six photos below are self-explanatory. They show a small section of that slide. They are all derived from the bottom photo, the OSIRIS original. It’s the Valentine’s Day 2015 flyby photo taken from 6km. The photo embargo was lifted today. This gif was done six months ago and was awaiting the embargo lift hence its immediate posting. Photo credits are after the original. Zoom is needed in the penultimate photo to see the fiduciary dots that denote the red ‘tray’.
If you’re familiar with the stretch blog, you will fully expect the blue circle to split in two. It’s predicted in the page entitled “Sliding in Western Imhotep”. The right hand, green rift line in photo 6 of that page goes right through the circle. The split circle in that photo is actually marked orange as opposed to blue, and you can see one half of it is shunted back slightly i.e. along the rift as well as splitting sideways.
The mini match in this gif and accompanying photos corresponds to the 5 red dots that are furthest to the right in the Western Imhotep page photo 6.
That photo also shows the split circle’s unsplit twin but you’ll have to read that page to see why it has a twin. Suffice to say that the twin, the rift, and the 700-metre slide across the smooth terrain are all complementary and consistent with one process, crust sliding. It’s already been dealt with in Part 43. This gif just supports what’s already been laid out in that part. Other mini matches for the red slide will be published in due course.


Copyright ESA/Rosetta/MPS for OSIRIS Team MPS/UPD/LAM/IAA/SSO/INTA/UPM/DASP/IDA/A.COOPER
COMMENT 5- regarding the OSIRIS photo in this Rosetta blog post:


Copyright ESA/Rosetta/MPS for OSIRIS Team MPS/UPD/LAM/IAA/SSO/INTA/UPM/DASP/IDA/A.COOPER
COMMENT 6- Context photos for OSIRIS photos for 4th, 8th and 11th July 2016.
4th:

 8th (straight edge at top is Cliffs of Aten):


11th:


Top of each pair:
Copyright ESA/Rosetta/MPS for OSIRIS Team MPS/UPD/LAM/IAA/SSO/INTA/UPM/DASP/IDA
Bottom of each pair:
ESA/Rosetta/NAVCAM – CC BY-SA IGO 3.0/A.COOPER
